Monday, November 26, 2018

Illuminate - "Testing Window Closed" Error?

Getting “Testing Window Closed” when trying to give an assessment in Illuminate?

It could be that the Administration window has expired. This can happen if you assigned an assessment before the Thanksgiving Break and your students didn't get a chance to complete it.  Illuminate sets an end date on tests once they are opened.

You can check this by viewing the assessment details. Edit this by clicking on the roster ID # and entering a new ending date.

Thank you to superstar Monique Judge for figuring this out for us!

Screen Shot of Illuminate showing testing window.


Screen Shot of Illuminate showing how to change testing window.

Monday, November 5, 2018

Portal: Not Connected Message Quick Fix!

Not Connected Messagewith a  Back to Login Button

Have you seen this Not Connected Message when logging into the portal?


This means you need to connect your Google Account in order to use the Sign in with Google Button.  All portal users, staff and students, need to complete this one-time action if they wish to use the Sign-in with Google Button to access the portal.

Here's how to connect your Google Account.

  1. Return to portal login 
  2. Login using your regular computer credentials and password and Click Sign-in
    apple and bridge logo with username and password boxes with signin
  3. Once inside the portal, visit My Profile > Sign-in Options > Connect Google Account
  4. Done!  Now you can access the portal on Chromebooks and other devices where you are signed into Chrome using the Sign in with Google Button.

Reminder: This is a one-time action required of all staff and students who wish to access the portal using the Sign-in with Google Button. 

Wednesday, October 31, 2018

Manage your Lexia/PowerUp Roster

Teachers! You can manage your Lexia Rosters following these simple steps.


  1. Login to myLexia.com and click the Manage tab.
  2. Make sure you are on the Classes list.
  3. Find the class you want to edit and click the pencil icon in the class's row.
  4. Click the Modify Students button to add or remove students. 
    1. Looking to Add Students?  Search for them > Add to Selected Students. If a student doesn't appear in your search the day after first day of enrollment, please complete a helpdesk ticket letting us know.
    2. Looking to Remove Students? On the list of selected students, Click the x next to the name of students no longer in your class.
  5. When you are finished editing the class, click the Done > Save button.
Once your roster is complete and current, you'll be able to see how students are progressing through the program, access Skill Builder lessons, and see the individualized small group lessons for students struggling and requiring additional instruction.


Wednesday, September 26, 2018

Chromebook Updates


Fun Fact:  Did you know that Chrome is updated about every 6 weeks?  


When you see this little arrow icon near your account photo in the shelf, that means there is an update available.  FINISH THAT UPDATE by clicking on the arrow icon to restart.


If you have Chromebooks that aren't used regularly, they may need a little nudge to run an update by following these instructions:
  • Log into your Chromebook (if you aren't on campus, make sure you are connected to WiFi)
  • Click your account photo.
  • Click the SETTINGS icon that looks like a flower.Settings
  • Click the SETTINGS MENU icon, aka "the hot dog,".Menu
  • Click "About Chrome OS" on the bottom of that menu
  • Under "Google Chrome OS," you'll see which version of the Chrome operating system your Chromebook is using. 
  • Click Check for Updates. 
If your Chromebook finds a software update, it will start to download automatically. You may be asked to restart your Chromebook to complete the update.


Monday, September 10, 2018

Chromebook Log-In Error: BYPASS the "unlock and restore local data" error message


THE PROBLEM.

When logging into a Chromebook, Chrome asks for an old password. 
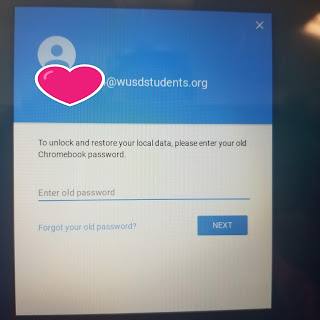
Chromebook error screenshot: Log in with your old password
"To unlock and restore your local data, please enter your old Chromebook password."

HOORAY! A SIMPLE SOLUTION!


There is a simple workaround. Just click "Forgot your old password,"  then click "proceed anyway." The student will then be able to log on and access all of their cloud-based resources.
Chromebook screenshot: request for old password
Select" Forgot your old password?"
Chromebook screenshot: You may proceed
Success! You may proceed!


 BUT WHY?

This happens when a student uses the Chromebook, modifies their profile settings or changes their password at a different device - may be it was on a different Chromebook in another class, or working from home - then comes back to your class to log in again. The Chromebook recognizes that the user has logged into this device before, but doesn't recognize the (new) password. Chrome thinks it's being helpful by asking for the old password to sync any data that may have been stored locally on the device.


This is only an issue for data stored on the local machine. It does NOT affect the user's ability to access data stored in the cloud (Drive, Docs, Mail, etc).  At WUSD, students are not downloading content or storing data on the local machine. All files should be stored in the student's Google Drive account.